Tuesday, June 4, 2013

HOT Weather and HOT Wax, sans Ice cream!

Well, summer has begun and it is HOT HOT HOT in Philly already. What better way to celebrate the summer and art making, than by working in a process where you have to stand over a HOT plate with HOT wax and HOT water so that you can make some COOL images. YAAY Encaustic painting! Ok, so I must admit, I am not too sure how sold on this process I am. I have always wanted to try it but just never did. Here is the story...

My Amazing, Smart and Creative friend Cheryl and I often get together with her fab daughter to have these marathon cooking and art making sessions. That isn't all we do together, we go on adventures, shopping, eat Indian food etc. (we love Indian food :) )  and all of the other normal things that friends do. However, we really like to cook new things and make new things together. Thus far, we have made many different types of books, done some Decoden, ( I will post about this later) and cooked up a bunch of delicious dinners, salads and desserts. So, Cheryl wanted to try Encaustic painting. I said, "why not?" and we did this past weekend, when it was like a million degrees out. Thank goodness for AC!  I suppose I should give a bit of background on Encaustic painting to start.

Encaustic Painting or painting with wax, is the process by which you melt bee's wax and add colored pigments to then paint with. In order for the wax to remain stable and not melt all over the place when the temperature changes, resin is mixed in so that the wax dries harder then usual. Cheryl actually picked some resin off of trees so that we could use it for this process. I also need to add that the beeswax we used came from her parents bees! We also used dry pigments, not the pre-made Encaustic colors. Encaustic paintings are usually done on a wood surface, but we tried it on a piece of coated masonite as well as smaller wood panels that we painted with some acrylic base colors. You can also use clay board. A slightly porous surface works best. The smoother the surface, the easier it is to get smooth lines. It takes some getting used to painting with a substance that dries almost immediately. While we were working on the paintings, I was doing some research on line and found a process for sealing the paintings by doing what is called "Shellac Burning". You can add pigments to the shellac or use it plain. We chose clear shellac without pigments. This was the best part! We set them on fire!! Ok, not really. This process is kind of like making Cherries Jubilee or Bananas Foster. You pour some liquor over the cherries or the cooked bananas in the pan and then light it up. All the alcohol burns away leaving the lovely flavor of liquor. This process worked the same way, except we brushed the shellac on and we didn't have any ice cream.

At first, we didn't have any shellac so we tried varnish. This did not work. Although varnish is supposed to be combustible, it didn't catch fire like the shellac did. That was no fun. Take a look at the pictures to see the paintings I made and the shellac and varnish burning.

Cheryl and I are going to give this one more try on a larger scale and with a more varied color palette. for now, this is what I got. It happened, and it was good. Next time though, we need to make sure there is ice cream!

This is the gang all together! As you can see, we had a limited palette and didn't really mix too many colors.

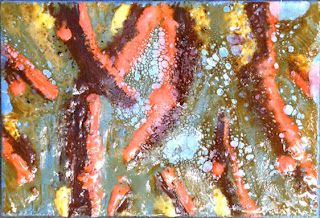
You can see the texture here, kind of "chunky". This is called "Growth"

This is "Growth" after the varnish burn. We had to focus the heat to make it burn and the varnish we used was a golden color which changed the color of the original image. I think I would prefer something in between these two.
This is one of my favorites of the group. I call it "City" I didn't shellac burn this one because I didn't want the image to be altered. When the shellac burns, the wax melts a bit and it sometimes changes the integrity of the image.

As you will see in this video if you watch, the wax moves when the flame is burning off the alcohol in the shellac. This can alter the image greatly. My assessment of this is that we didn't add enough Resin to the beeswax mixture to make it harder and more stable.

This is called "Energy" I did shellac burn this one and it changed a bit.

This is my final painting "Pods". It's on coated masonite. I didn't burn this one either because we realized that the wax began to move away from the coating on the masonite and leave open areas. We didn't like that so I didn't do it. I plan to coat one of them with Modge Podge and see how well it seals as well as if I like the shine on the surface.

I know this was an extremely long post but I hope, worth the read. Next time, we want to try doing some burnishing with turpenoid. I will be sure to post those results!

Thanks for reading. :)


Sunday, September 30, 2012

Influence and Inspiration of old friends!

Ok, so lets be real here, I am probably the worst blogger in the universe. I fully admit that keeping up with this blog is one of my short comings. It's ok though because I keep thinking about it and one day aspire to get to the point where I am making posts at least once a week. We have to make goals that are attainable right? Having said that, I have been painting a bit and am quite happy (at times) with my progress. I will be posting some images of my paintings so that my progress is fully visible. Not only for me but for those who are interested.

Did you notice the title of this blog post? Well, last week, I had the pleasure of re-connecting with some good friends from college whom I lost touch with many years ago. I was so happy to speak with both of them, they made me laugh just as much as they always used to. The memories made with them were very special to me and I will always cherish them. What the heck does any of this have to do with my blog and art you ask? I will tell you. Both of them, not one, but both, told me that they took a look at my blog. (yikes)  Much to my dismay, I had to explain my grandiose intentions and also confess that I was a blog slacker. The artwork part is getting done, but it's just not making it's way to the blog. Conundrum!! I mentioned to my good friends, probably in throws of happiness and glee from having such fun and wonderful conversations about family and 25 years of catching up, that I was going to be better about making posts since there are people out there who might be looking. So here we are! NOW, onto the art!

These first few paintings precede what I call the "Breakthrough" painting which is also here.


Working with Acrylics has posed to be fun, confusing, satisfying, puzzling, frustrating and just plain enjoyable. I am generally happy with what has been happening, but I am still trying to get my bearings and fall into a groove. I think that is slowly happening. The last painting out of the three encompasses some elements that wish to continually incorporate in my paintings.


This is the what I call the Breakthrough painting. It's bitter sweet because this was sold. I painted this at the 2011 Battle of the Canvas and it is definitely the direction that I want to move in with my paintings. Color, layers, type, texture, etc. I know that I need to work larger because I need more space to move around the surface. My marks are large and expressive, small doesn't work as well for me.

Yesterday, I participated in another Art Battle. I feel like these battles are helping me to become comfortable with acrylic paints. Because they are timed, I don't have the luxury of pondering too much about what to do. I need to be direct and work with a sense of confidence. This is the result. I must note and give a shout out to Stephen Haigh because initially this was a collaboration. I finished it up and think that I made it my own.

I am excited about my next paintings and future posts! Be sure to check back and see what's new!

Tuesday, July 5, 2011

ENTRIES FOR 1000 BOOKS - To Sandra

Hello there Sandra, Hope you like what you see here. The titles are as follows
"Cast a Spell"
"Do You?"
"Her Smell"
"Philosophy of Race: My Race Cards"
Then finally, a Terrible Photo, but I thought I would include it  anyway, it's called simply,
"Glass Book" 

Thanks for taking a look at my work!

Cheers!


Rosae

Sunday, April 10, 2011

Better late than never part 3

Ok, this is the last entry for the better late than never postings. I have officially begun to work this Blog!! Yaay! This is one of my most recent prints. Also experimental and a demonstration that I did for my students on Pressure printing with the letterpress printer. THE VANDERCOOK!! Dun Dun Dunnnn. Anyway, I am loving the look of this. I really want to come up with a fantastic idea to use this process. I just might turn this print into a little book. First, I have to print on the other side. Back to work!

Better late than never part 2

This is a Paper Lithograph of a photograph that I took while in Greece. It's of a reliquary compartment in this beautiful cemetery. I have used these images before and will continue. Paper Lithography is one of my favorite alternative printmaking processes. It utilizes the same theory of oil and water don't mix that traditional lithography uses. I love it. It's so immediate and the image quality is exactly how I like my images to look. Textural.

Better late than never right?

OK, so yeah yeah, March, blah blah. Well you know what. Life happens. I wanted to start this project because I want to begin making more art. Don't get me wrong, I make things all of the time, but I really wanted to embark upon a new adventure in making. So here we go...I am a bit late with the posts but I have 3 things to show. The first is an experimental print that I made with my friend and Colleague James. He is really into Spray painting his prints along with using traditional lithography. He suggested that we try this with Cyanotype. Here is my result. Purely a test. I used some cut paper and spray painted the eyes, nose and mouth with a bit of extra yellow around the edges. It's ok. I don't love it, but it has some potential for other applications of the spray paint with this medium. This was made in middle March.

Friday, October 29, 2010

And then there was light!

You know how you get an idea and at the time it seems like the most amazing and wonderful thing ever? Well, here it is. I am sure this has been done before. But I haven't done it. And furthermore, I have certainly not blogged about it. So, this is it. I am embarking on a journey which I believe will change my life and my art. Now when I say change my life, I don't mean cataclysmic change. Just plain change, Isn't that enough?  I Make things all of the time. Books, Prints, Jewelry, etc. I am most happy when I am making anything. Recently I feel the need to make more time to MAKE. Anything. Just MAKE. So, I will.

Starting the first week in March, each week, I will post an image of each piece with a description. I will also try to make posts that relate to this project throughout, you know like gentle musing of the stuff that goes on in my head (YIKES). By the end of next March, 2012, hopefully I will have discovered something new about myself and my art. Although this is my journey, I would like to invite others to post images of making as well. They are invited to take this journey with me. We shall see what happens!

So, here we go.