My Amazing, Smart and Creative friend Cheryl and I often get together with her fab daughter to have these marathon cooking and art making sessions. That isn't all we do together, we go on adventures, shopping, eat Indian food etc. (we love Indian food :) ) and all of the other normal things that friends do. However, we really like to cook new things and make new things together. Thus far, we have made many different types of books, done some Decoden, ( I will post about this later) and cooked up a bunch of delicious dinners, salads and desserts. So, Cheryl wanted to try Encaustic painting. I said, "why not?" and we did this past weekend, when it was like a million degrees out. Thank goodness for AC! I suppose I should give a bit of background on Encaustic painting to start.
Encaustic Painting or painting with wax, is the process by which you melt bee's wax and add colored pigments to then paint with. In order for the wax to remain stable and not melt all over the place when the temperature changes, resin is mixed in so that the wax dries harder then usual. Cheryl actually picked some resin off of trees so that we could use it for this process. I also need to add that the beeswax we used came from her parents bees! We also used dry pigments, not the pre-made Encaustic colors. Encaustic paintings are usually done on a wood surface, but we tried it on a piece of coated masonite as well as smaller wood panels that we painted with some acrylic base colors. You can also use clay board. A slightly porous surface works best. The smoother the surface, the easier it is to get smooth lines. It takes some getting used to painting with a substance that dries almost immediately. While we were working on the paintings, I was doing some research on line and found a process for sealing the paintings by doing what is called "Shellac Burning". You can add pigments to the shellac or use it plain. We chose clear shellac without pigments. This was the best part! We set them on fire!! Ok, not really. This process is kind of like making Cherries Jubilee or Bananas Foster. You pour some liquor over the cherries or the cooked bananas in the pan and then light it up. All the alcohol burns away leaving the lovely flavor of liquor. This process worked the same way, except we brushed the shellac on and we didn't have any ice cream.
At first, we didn't have any shellac so we tried varnish. This did not work. Although varnish is supposed to be combustible, it didn't catch fire like the shellac did. That was no fun. Take a look at the pictures to see the paintings I made and the shellac and varnish burning.
Cheryl and I are going to give this one more try on a larger scale and with a more varied color palette. for now, this is what I got. It happened, and it was good. Next time though, we need to make sure there is ice cream!
This is the gang all together! As you can see, we had a limited palette and didn't really mix too many colors.
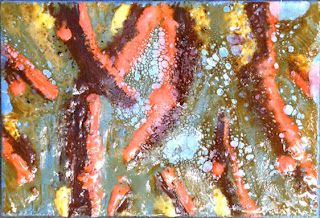
You can see the texture here, kind of "chunky". This is called "Growth"
This is "Growth" after the varnish burn. We had to focus the heat to make it burn and the varnish we used was a golden color which changed the color of the original image. I think I would prefer something in between these two.
This is one of my favorites of the group. I call it "City" I didn't shellac burn this one because I didn't want the image to be altered. When the shellac burns, the wax melts a bit and it sometimes changes the integrity of the image.
This is called "Energy" I did shellac burn this one and it changed a bit.
This is my final painting "Pods". It's on coated masonite. I didn't burn this one either because we realized that the wax began to move away from the coating on the masonite and leave open areas. We didn't like that so I didn't do it. I plan to coat one of them with Modge Podge and see how well it seals as well as if I like the shine on the surface.
I know this was an extremely long post but I hope, worth the read. Next time, we want to try doing some burnishing with turpenoid. I will be sure to post those results!
Thanks for reading. :)


Love this!!
ReplyDelete